Buy all your VW California Accessories at the Club Shop Visit Shop
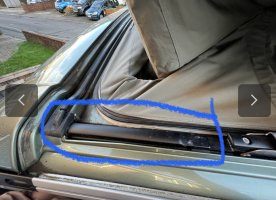
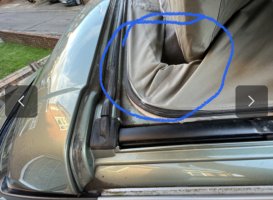
Front left side is leaking (door or roof)

M

mr_waxdope_noodle

VIP Member
Messages
61
Location
Brighton
Vehicle
T5 SE 174
Hi All,

After recent heavy rains I’ve noticed a wet spot on above passenger’s door (pictures attached). I’m planning to do more investigation in the morning. Do you have any ideas what this could be? Please help or suggest.

Jev

293C23AE-0FF8-4329-9563-E54279DE14C3.jpeg

EBCF1DFB-5F8F-448D-B0E2-69442821836B.jpeg

9DCCAFA9-AFDA-4AAF-8562-2ACCBC0581A5.jpeg

6E20E23F-882B-4DB0-8EF0-9FB9BE8AB0F0.jpeg

C6520B93-A568-4A70-8406-4AC73B3E9A64.jpeg

681CD753-DD8F-48F9-BEAE-282212EB1122.jpeg

2FDE7809-3599-4CF9-B3F2-0F637875AB6F.jpeg

5C77F162-3DCC-48CE-A182-638E0153B6B2.jpeg

E636B042-5B2B-40FE-A137-ADE6BDC3B37A.jpeg

3E1CFB86-FA46-4C63-8B61-C5FA1F4324D2.jpeg
 
P.S. I have 2 days to fix this before the next rain :)
 
I’m guessing it might be the drain tube that runs from the roof drain to the engine bay has disconnected or been damaged. Lots of previous discussions posts about it
 
Yeah, was planning to look at the drain. Thank you! Any other ideas?


Sent from my iPhone using Tapatalk
 
Does the drain get used when the roof is closed?


Sent from my iPhone using Tapatalk
 
Yes. As I discovered it does a lot. Search Footwell Leak to see my saga. My van was full of water from that corner at half term. Now fixed.

This bit lifts up. No screws. You’ll see wires going into the A pillar. Under those there is a small hole hiding.
84D0D6F6-7B0C-434A-8D05-9D645B55BE43.jpeg
You might need to get a syringe off Amazon to squirt some water down there to clear it. Oddly though the channel doesn’t appear full of water.
 
Last edited:
The way the roof canvas is folded looks a little odd. Is that normal?
1F896FB1-3C7A-4DDA-83FB-B9C88A0D7C85.jpeg
Is it an elastic band? I wonder if the way the canvas is folding is creating a place for water to pool and then slowly seep through. I personally am not a fan of bands. Is the plastic strut in the canvas broken?

A couple of years ago, I got in the van, opened the hatch and about half a bucket of water fell on my head. It had been getting in the roof and pooling in the canvas and slowly leaked through. Hasn’t happened since.
 
Last edited:
The way the roof canvas is folded looks a little odd. Is that normal?
View attachment 102083
Is it an elastic band? I wonder if the way the canvas is folding is creating a place for water to pool and then slowly seep through. I personally am not a fan of bands. Is the plastic strut in the canvas broken?

A couple of years ago, I got in the van, opened the hatch and about half a bucket of water fell on my head. It had been getting in the roof and pooling in the canvas and slowly leaked through. Hasn’t happened since.

Thank you for your reply. What do you mean odd? I don’t have elastic band yet. Plastic strut? Inside? I think everything is in order. I’ll record a video of folding roof for you. This could be a gravity as I’m park on slope and the roof it not fully opened on the picture.


Sent from my iPhone using Tapatalk
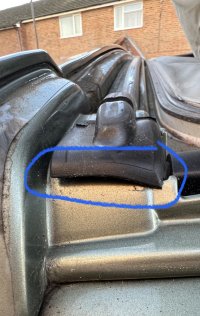
 
It may not be the the drain pipe. Mine leaked around the “rubber” grommet that the drain pipe connects to.
 
Thank you for your reply. What do you mean odd? I don’t have elastic band yet. Plastic strut? Inside? I think everything is in order. I’ll record a video of folding roof for you. This could be a gravity as I’m park on slope and the roof it not fully opened on the picture.


Sent from my iPhone using Tapatalk
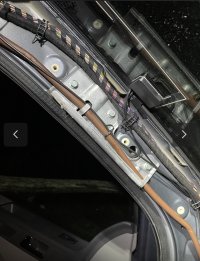
I just thought it looked odd how it was sagged almost into a bucket shape. If water had got in there it would be wet so maybe not.

This bit of rubber looks not quite right. That’s the bit that has the hole with the drain in it. Have you found the drain hole? It should connect to a brown tube that goes down the A pillar.

F2613D18-EB89-4648-ABCE-3F79147D0C2B.jpeg

BDA9DBC4-E008-4C42-9F1F-D411FE514ECE.jpeg
Perhaps they have become disconnected. Mine had become disconnected at the other end behind the dash with water in footwell. Perhaps yours isn’t connected at the top which is where your water appears to be leaking. Not easy to get at. Maybe take out A pillar inside trim. Vids on YouTube show how.
 
Last edited:
Good point on the rubber, will check it. Didn’t have a chance to get to the drain yet, stuck at the vets.


Sent from my iPhone using Tapatalk
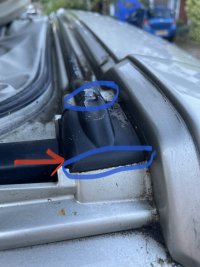
 
Mine
1A438ED8-49B3-4A81-88FF-88A7FFB64E44.jpeg
My driver side -
1668773175170.jpeg
Red arrow is drain under plastic cover that pulls off. On mine rubber part tight with no gaps. Yours looks like it might have been removed at some point. Perhaps when roof fix done.

If you want to test the drain working you need to squirt water down it with syringe. Not too fiercely as not to break it. Water should then drip from wheel arch where it leads to. That would at least rule that out as cause.

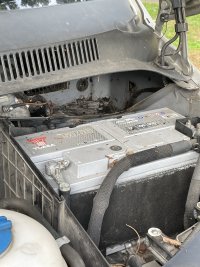
For a more definitive test. Remove this panel under bonnet to see drain exit. You’ll need a torx screwdriver for that. T30 I think.

28A2B561-FA80-499F-A25A-262240F79F48.jpeg
This is v useful!
Stanley 097552 1.5 - 8mm Fatmax Locking Hex Key Set https://amzn.eu/d/bW6nF9s

ArunAlec’s thread above may be more similar to your problem. Good luck
 
Last edited:
Mine
View attachment 102090
My driver side -
View attachment 102097
Red arrow is drain under plastic cover that pulls off. On mine rubber part tight with no gaps. Yours looks like it might have been removed at some point. Perhaps when roof fix done.

If you want to test the drain working you need to squirt water down it with syringe. Not too fiercely as not to break it. Water should then drip from wheel arch where it leads to. That would at least rule that out as cause.

For a more definitive test. Remove this panel under bonnet to see drain exit. You’ll need a torx screwdriver for that. T30 I think.

View attachment 102095
This is v useful!
Stanley 097552 1.5 - 8mm Fatmax Locking Hex Key Set https://amzn.eu/d/bW6nF9s

ArunAlec’s thread above may be more similar to your problem. Good luck

After some investigation I can report this:
- drain tube is connected and clean. I tested it with the syringe, tube is dry, water goes trough and I can see it’s draining next to the wheel
- the rubber indeed was looking odd, after I opened it I saw a hole (please see pictures). I tried to apply a little bit of water and I saw an A pillar getting wet next to the grab handle. My guess the water was collecting there and the whole liner above the head got wet during recent heavy rains.

Any ideas how can I remove it? Do you know a product code i can buy a new one?

Could you suggest a me a quick temp solution as we are expecting rain on Sunday

Hopefully this leakage can be fixed relatively cheap, fingers crossed.

What do you guys think?

Thanks, Jev

a9761cd328d96b34e87e811f5e5e7fb3.jpg

c0741939d0a8bba03e0a31ec6fadd9ef.jpg

add88422005ee2fb4c6f64827e52608e.jpg

520d70bccb8973887f4fdb041faaccda.jpg

de120be652df2193aa4628777abc3fd4.jpg


Sent from my iPhone using Tapatalk
 
Pictures from the inside, you can see the light is coming through the hole where this rubber is
5aeac8b06f3ef54c1e066699b0f5b2f1.jpg


3ba4949d77da24be7ae51466a4fac913.jpg


Sent from my iPhone using Tapatalk
 
It may not be the the drain pipe. Mine leaked around the “rubber” grommet that the drain pipe connects to.

It seems I have the same issue! You can check pics in previous post


Sent from my iPhone using Tapatalk
 
I’m not sure I have great suggestions. Is there any reason the rubber won’t fit back on better? Why was it wonky? If so I would probably clean around the hole with cotton buds, dry it and put a little bathroom silicone on the hole and then put the rubber back, possibly with a small amount of silicone around it.

Other than that I typed “how to patch small metal hole?” into Google and various products came up. Including -

https://amzn.eu/d/0VAzLA4

https://amzn.eu/d/37ING6P

Quite a few different products on the net -

“Epoxy​

Several brands of epoxy glue or putty are available, specifically made to use on steel or other metal. These products always require mixing two different components together that chemically react with each other to form a hard, sticky putty or glue. Epoxy "weld" is perfect for plugging holes in thin metal and in many instances, the results can be a permanent fix to the problem.”
 
Last edited:
I’m not sure I have great suggestions. Is there any reason the rubber won’t fit back on better? Why was it wonky? If so I would probably clean around the hole with cotton buds, dry it and put a little bathroom silicone on the hole and then put the rubber back, possibly with a small amount of silicone around it.

Other than that I typed “how to patch small metal hole?” into Google and various products came up. Including -

https://amzn.eu/d/37ING6P

Quite a few different products.

As I understood, this is not a metal hole, it’s soft, from the inside it looks like a grey sealant.

I’ve managed to put the rubber back in place, it fits almost perfectly. However, I don’t think this will fix the issue and it will leak again.

It seems the easiest thing to do will be to apply a sealant. I will check with people on this forum who didi it already.

Another option is to replace the whole grommet, sound as more complicated task. Have anyone done this before? Any instruction would be great!

Meanwhile I’ll park Cali other way around on the drive way, will try to keep the front of the car higher as rear.

Jev


Sent from my iPhone using Tapatalk
 
Pictures from the inside, you can see the light is coming through the hole where this rubber is
5aeac8b06f3ef54c1e066699b0f5b2f1.jpg


3ba4949d77da24be7ae51466a4fac913.jpg


Sent from my iPhone using Tapatalk
Whatever the reply and solution is, you must win 'best photographs on here' competition for showing what's going on.

Small consolation, I know, but really useful for the rest of us to see what happens under those covers.
 
Whatever the reply and solution is, you must win 'best photographs on here' competition for showing what's going on.

Small consolation, I know, but really useful for the rest of us to see what happens under those covers.

Lol, I tried my best!


Sent from my iPhone using Tapatalk
 
Whatever the reply and solution is, you must win 'best photographs on here' competition for showing what's going on.

Small consolation, I know, but really useful for the rest of us to see what happens under those covers.

One more
0878eee7c2764dc9e76d3b236f1684e2.jpg


Sent from my iPhone using Tapatalk
 
Does anyone know where I can fix this issue professionally? Local garage specialising in VWs tried, but didn’t fix the leakage. They said it could be due to some roof corrosion, which is a known problem (as they said). I’m in South East, Brighton area. Please help.

P.S. or at least where can I try to find some help? Bodyshops? Official VW garage?
A product like Sika Flex can be used to fill that hole and be totally waterproof, the original sealant clearly has a hole in it.
there other products available from Builders merch, look for a product that is an adhesive sealant all in one & one that will cure under water.
Available in all sorts of colours, suggest either clear or white.

Clean the area fully, mask up the surrounding area (External ) and pump some into the hole so that you are sure it’s gone into to gap, apply a thin bead over the hole & a very thin coat to the underside of the rubber, refit the rubber, wipe off any excess and firmly tape it in position with duct tape or similar (fitted flush & correctly) leave for 24hours Or as the product instructions.
If you cant tape the rubber cap securely down use something to weight it down, making sure the rubber cover is seated perfectly as the sealant will stick like S*#t to a blanket and you wont get it off easily

don’t leave the duct tape on the paintwork for much more than 24hours

if you need to you can apply a very small bead to the edge of the rubber cap after it has been refitted and the initial sealant filling the hole / holding the rubber cap has cured fully.

edit : some of these products are not very viscous, placing the unopen tube in warm / hot water before use will make it more viscous and allow you to apply it more easily via a mastic gun
 
Last edited:
A product like Sika Flex can be used to fill that hole and be totally waterproof, the original sealant clearly has a hole in it.
there other products available from Builders merch, look for a product that is an adhesive sealant all in one & one that will cure under water.
Available in all sorts of colours, suggest either clear or white.

Clean the area fully, mask up the surrounding area (External ) and pump some into the hole so that you are sure it’s gone into to gap, apply a thin bead over the hole & a very thin coat to the underside of the rubber, refit the rubber, wipe off any excess and firmly tape it in position with duct tape or similar (fitted flush & correctly) leave for 24hours Or as the product instructions.
If you cant tape the rubber cap securely down use something to weight it down, making sure the rubber cover is seated perfectly as the sealant will stick like S*#t to a blanket and you wont get it off easily

don’t leave the duct tape on the paintwork for much more than 24hours

if you need to you can apply a very small bead to the edge of the rubber cap after it has been refitted and the initial sealant filling the hole / holding the rubber cap has cured fully.

Thank you! I will give it a go after I do several water tests with garage’s sealant fix.

Do you know anything about roof corrosion? What this could be and what issues this could cause.

I’m just trying to trace this leakage. It’s coming from different location now. However, the car is parked on the slope, front left at the lowest point and is difficult to say where the water is coming from.

I’m thinking about removing a headliner to see what’s happening there. Any instructions how to remove it next to the control unit and around the sliding panel above the head?

Thanks, Jev


Sent from my iPhone using Tapatalk
 
Back
Top